Getting Started with Ansible
Ansible is a powerful automation tool that enables infrastructure as code (IaC) to automate configuration management, application deployment, and task automation. Unlike other automation tools, Ansible does not require an agent and uses SSH for communication.
1. Training Objectives
1.1. Skill Objectives
- Install and set up Ansible on a control machine.
- Understand Ansible's inventory and playbook structure.
- Execute ad-hoc commands using Ansible.
- Write basic Ansible playbooks for task automation.
1.2. Knowledge Objectives
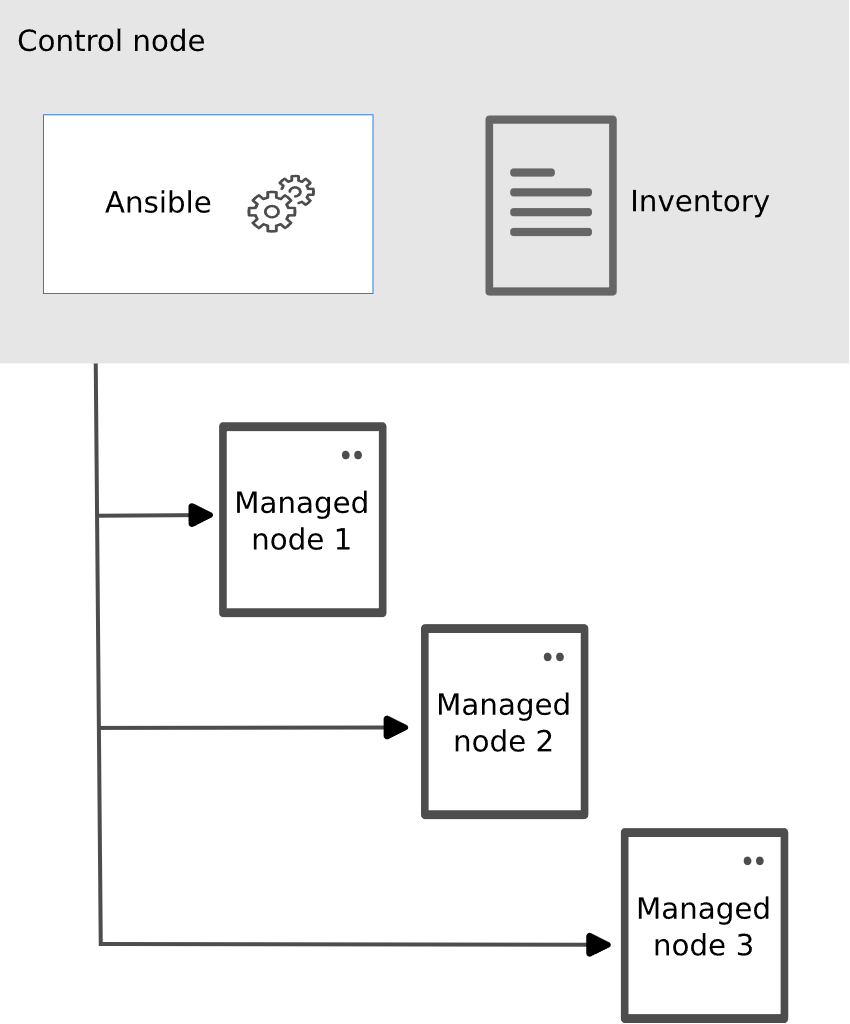
- Understand the architecture and components of Ansible (control node, managed nodes, inventory, playbooks).
- Grasp the YAML syntax, which is used for writing Ansible playbooks.
- Comprehend Ansible modules and their roles in automation.
2. Concepts
- Control Node: The machine where Ansible is installed and from which all tasks and playbooks are run.
- Managed Nodes: Target servers where tasks should be executed.
- Inventory: A file that contains a list of managed nodes.
- Playbook: YAML scripts that define the desired state or tasks to execute on managed nodes.
3. Key points
3.1. Commands
ansible: Used for executing ad-hoc commands.ansible-config: Command to view and modify Ansible configuration.ansible-playbook: Command to run playbooks.
3.2. Configuration files
ansible.cfg: Primary configuration file for Ansible.hosts: Default inventory file in ini format.inventory.yml: Inventory file in YAML format.
4. Examples
4.1. Install Ansible on Control Node
Requirements for the control node:
- ssh
- ssh key (Optional)
- python3 and python3-passlib
- ansible
- root permission
- static IP
- hostname (Optional, requirement in Test Project)
- .vault_pass (Optional, for encrypting sensitive data)
- curl, wget, sshpass (Optional, for vscode offline installation)
Requirements for the managed nodes:
- ssh
- ssh authorized_keys (Optional)
- python3 (It is recommended to install python3 on managed nodes, but not required.)
- static IP
- root permission (Optional)
- sudo (Optional)
Install Ansible with apt on Debian:
Optional: Installing and upgrading Ansible with pip:
Confirm Ansible installation:
4.2. Create hosts or inventory.yml file
Create the /etc/ansible/hosts file in ini format:
Using the inventory.yml file in YAML format:
---
myservers:
  hosts:
    192.168.88.101:
    192.168.88.102:
    server03:
      ansible_host: 192.168.88.103
      ansible_port: 22
... # Optional
Verify the hosts in your inventory:
Ping the managed nodes:
-k option is used to prompt for the password of the user on the managed nodes if the ssh key is not set up.
if the hosts file is not in the default location(/etc/ansible/hosts), use the -i option to specify the inventory file.
if the username on the control node is different on the host, you need to pass the -u option with the ansible command.
4.3. Create a playbook
Playbook are automation blueprints, in YAML format, that Ansible uses to deploy and configure managed nodes.
- Playbook
A list of plays that define the order in which Ansible performs operations, from top to bottom, to achieve an overall goal.
- Play
An ordered list of tasks that maps to managed nodes in an inventory.
- Task
A list of one or more modules that defines the operations that Ansible performs.
- Module
A unit of code or binary that Ansible runs on managed nodes. Ansible modules are grouped in collections with a Fully Qualified Collection Namespace (FQCN) for each module.
In the previous section, you used the ansible command to ping hosts in your inventory. Now let’s create a playbook that pings your hosts and also prints a “Hello world” message.
Create a file named ping.yml with the following content:
---
- name: test hosts
  hosts: myservers
  tasks:
    - name: Ping hosts
      ansible.builtin.ping:

    - name: Print a message
      ansible.builtin.debug:
        msg: "Hello world!"
Run the playbook:
In this output you can see:
-
The names that you give the play and each task. You should always use descriptive names that make it easy to verify and troubleshoot playbooks.
-
The Gather Facts task runs implicitly. By default Ansible gathers information about your inventory that it can use in the playbook.
-
The status of each task. Each task has a status of ok which means it ran successfully.
-
The play recap that summarizes results of all tasks in the playbook per host. In this example, there are three tasks so ok=3 indicates that each task ran successfully.
4.4. Create a playbook to scp ssh public key to managed nodes
---
- name: ssh connection
  hosts: myservers
  tasks:
    - name: create .ssh directory
      ansible.builtin.file:
          path: ~/.ssh
          state: directory
          mode: 0700

    - name: scp ssh public key
      ansible.builtin.copy:
          src: ~/.ssh/id_rsa.pub
          dest: ~/.ssh/authorized_keys
          mode: 0600
4.4.1. The other way to copy the ssh public key to managed nodes
Generate the ssh key pair on the control node:
---
- name: Generate ssh key
  hosts: localhost
  gather_facts: False
  connection: local
  vars:
    ssh_key_file: "/root/.ssh/id_rsa"
    ansible_user: root
  tasks:
    - name: Gen ssh key
      ansible.builtin.user:
        name: "{{ ansible_user }}"
        generate_ssh_key: True
        ssh_key_bits: 2048
        ssh_key_file: "{{ ssh_key_file }}"
Then copy the public key to the managed nodes:
---
- name: Generate ssh key
  hosts: localhost
  gather_facts: False
  connection: local
  vars:
    ssh_key_file: "/root/.ssh/id_rsa"
    ansible_user: root
  tasks:
    - name: Gen ssh key
      ansible.builtin.user:
        name: "{{ ansible_user }}"
        generate_ssh_key: True
        ssh_key_bits: 2048
        ssh_key_file: "{{ ssh_key_file }}"
4.5. Create a playbook to install apache2 package
---
- name: setup apache2
  hosts: myservers
  tasks:
    - name: install apache2
      ansible.builtin.apt:
          name: apache2
          state: present
          update_cache: false
You must have root permission to install packages in a linux system. So, Maybe you handle it with the following method:
- Use
rootuser to execute the task. The premise is that the managed nodes allow therootuser to login via ssh. - Use
becometo get root permission.
It has two methods to get root permission: su and sudo. The default method is sudo.
For example: Use su method to get root permission.
In ad-hoc mode:
In playbook:
---
- name: setup apache2
  hosts: myservers
  become: true
  become_method: su
  become_user: root # default
  tasks:
    - name: install apache2
      ansible.builtin.apt:
          name: apache2
          state: present
          update_cache: false
In ansible.cfg:
Define these variables in inventory or use them as normal variables.
Such as, create variables file /data/ansible/group_vars/myservers.yml:
ansible_user: 'demo'
ansible_password: 'password'
ansible_become: true
ansible_become_method: 'su'
ansible_become_user: 'root'
ansible_become_password: 'password'
See Using encrypted variables and files for details on how to avoid having secrets in plain text.
4.6. How to get help
-
ansible-doccommand (Better to grasp)# list all available modules ansible-doc -l # search for a specific module ansible-doc -l | grep apt # view the documentation for a module ansible-doc apt # view the documentation for a module in a specific collection ansible-doc ansible.builtin.apt # list all available plugins of a specific type ansible-doc -t lookup -l # view the documentation for a lookup plugin type ansible-doc -t lookup file # view the short discription of a module ansible-doc -s apt -
Ansible Official Documentation (Use when learning)
-
Use zealdocs to search the documentation offline. (Must grasp)
5. Exercises
Use Ansible to initialize the Debian system for easier use of Ansible.
The environment of the 3 Managed nodes:
- Debian 12
- Minimal installation
- Normal user
demowithoutsudo - Python is not installed
- Static IP address is set
- SSH service is running
Create a playbook named ansible-init.yml to initialize the Debian system:
- Install python3
- Setup SSH key pair for
demouser connection - Configure sudo with
NOPASSWDfordemouser
Hint:
gather_facts: False
ansible.builtin.raw
6. Practices
After the task of exercise is completed, create a playbook named system-init.yml to initialize the Debian system.
- Install
vim,bash-completion - Set hostname:
sever01,sever02,sever03 - Set timezone:
Asia/Shanghai - Set locale:
zh_CN.UTF-8
7. Expansions
- Building an inventory with groups, variables, and so on.
- Creating a playbook to implement more features with template, and so on.
- Ansible concepts: https://docs.ansible.com/ansible/latest/user_guide/basic_concepts.html
- Using Ansible command line tools
- Protecting sensitive data with Ansible vault
- Using Ansible modules and plugins
- Ansible tips and tricks
8. References
- Ansible Wiki: https://en.wikipedia.org/wiki/Ansible_(software)
- Ansible Official Documentation: https://docs.ansible.com/ansible/latest/index.html
- Zealdocs Usage: https://zealdocs.org/usage.html
- YAML Official website: https://yaml.org/
- YAML 入门教程: https://www.runoob.com/w3cnote/yaml-intro.html
- YAML Syntax for Ansible: https://docs.ansible.com/ansible/latest/reference_appendices/YAMLSyntax.html